How To Remove Wrinkles From Fabric In Photoshop will be the topic of our conversation on this particular occasion. There is, without a doubt, a great deal of information pertaining to Piximperfect Store available on the internet. As a result of the rapid development of social media, it is now much simpler for us to acquire new information.
There is a connection between the pieces of information pertaining to how to remove wrinkles out of a shirt in photoshop, Photoshop Remove Frizzy Hair, and Photoshop Shirt. Regarding the other items that need to be searched, one of those things is concerning Removing Creases & Wrinkles from Clothing in Photoshop – [VIDEO Tutorial ], which will also have something to do with Photoshop Remove Frizzy Hair.
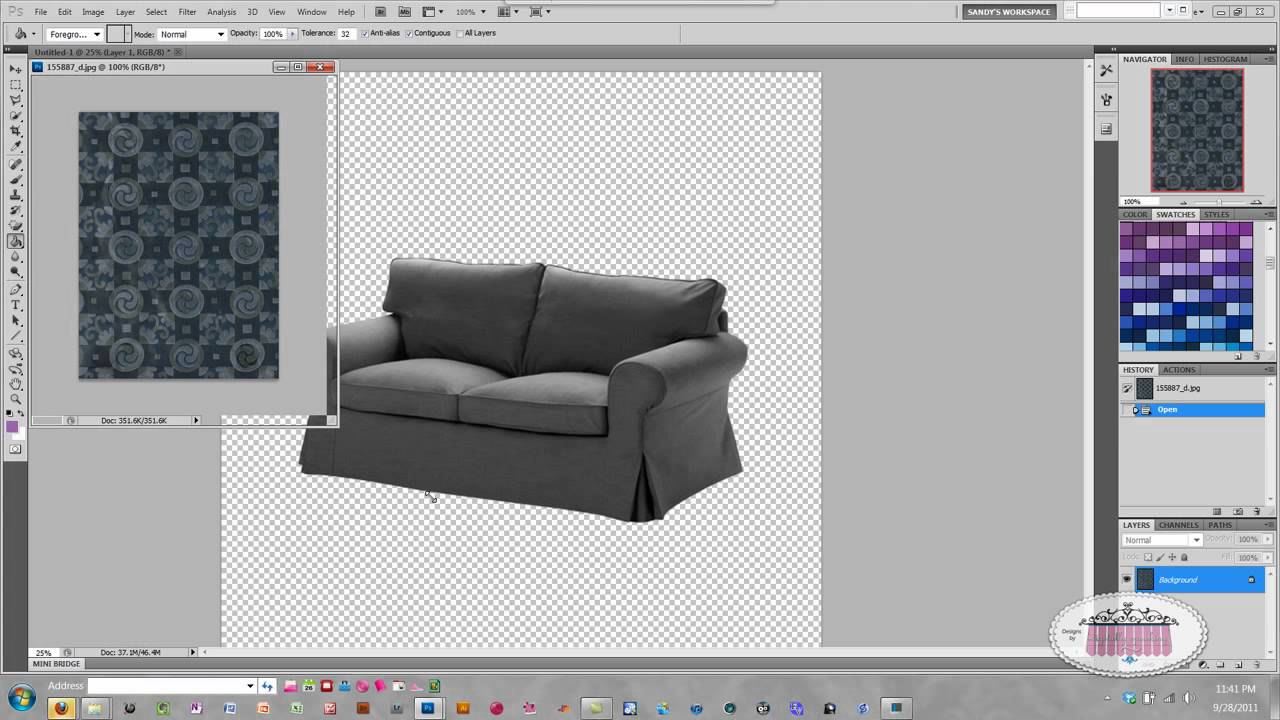
44 Tips to How To Remove Wrinkles From Fabric In Photoshop | How to remove clothing wrinkles in Photoshop?
- To display wrinkle-free clothing photos, you need to edit the photos in Photoshop. However, removing clothing wrinkles in Photoshop is not so easy. You need to apply a lot of editing processes to do the job. - Source: Internet
- You’ll now need to click and drag your cursor back to the same wrinkle and release the click. This will complete the process and remove the wrinkle. If there are several wrinkles that need removing from different areas of the garment, the Content-Aware Fill option may be the best solution for you. With this technique, you can select the wrinkles and then click and drag them to another area of the image. - Source: Internet
- Spot healing brush tool is a popular one that is used to remove wrinkles in photoshop. This tool is not just easy to use; it is time-saving too. Here is how this tool works – - Source: Internet
- With YouCam Perfect app, you can make your clothes wrinkle-free in no time. It only takes a few quick taps to get a whole new look, whether you’re getting rid of wrinkles or trying on a whole new wardrobe. Download YouCam Perfect for iOS or Android to remove clothes wrinkles from a photo today! - Source: Internet
- In the course of photoshopping portraits, it’s highly significant that you are attentive to details, because overlooking any part can lead to damaging the picture. This is particularly relevant when a model’s appearance is of great concern to you. Everyone who is a professional retoucher, must ought to know to carefully examine photos and spot imperfections that requires any fixing, like folds or wrinkles. - Source: Internet
- Photoshop’s Healing Brush, along with a little time, effort and patience on my part, did a great job of removing the man’s wrinkles. But if I was to show him the image at this point, I’m not so sure that he would be impressed. He, and everyone who knows him, knows that he has very distinct wrinkles on his face, and those wrinkles are part of his character and personality. He’d probably be upset, and maybe even insulted, if they were suddenly gone. To make things look more natural, we need to reduce the impact of our retouching work by letting some of the original image show through. - Source: Internet
- The beginner photo editors may distort the clothing fabric if they don’t know how to remove clothing wrinkles in Photoshop properly. In this way, the final look of the clothing photo will be horrible. You should follow the above guideline step by step and apply it to the photos to get the exact result. - Source: Internet
- Photoshop has numerous tricks up its sleeve when it comes to fixing and eliminating wrinkles from photos. Here is a quick and easy method to help you get rid of those pesky creases. Unless you want to believe in professionals for this task. You can always outsource your clothing photo editing tasks to us. - Source: Internet
- Another reason you should know how to remove clothing wrinkles in photoshop, this will give a clear idea of the texture. The quality of the clothing can easily be understood by removing the wrinkles. This is important for not just online businesses. Fashion houses also need high-quality images for advertisement. - Source: Internet
- As you can see, there are many different ways to remove wrinkles from clothing using Photoshop. If you’re only dealing with a few wrinkles, you can use the Clone Stamp tool. If you have wrinkles in different areas of your photo, or if you have a large wrinkle that covers a large area, the Content-Aware Fill option is a great choice. - Source: Internet
- The first method we’ll look at is using the Clone Stamp tool. This is a great way to remove wrinkles, especially if they are all in one place. Select the Clone Stamp tool and select a soft brush. Choose a brush size that is large enough to cover the entire wrinkle. Then, click onto the wrinkle and drag the brush over the area. - Source: Internet
- With the blend mode set to Lighten, the only pixels on the Reduce Wrinkles layer that will remain visible are the ones that are lighter than the pixels in the original image below it. Since wrinkles are usually darker due to the shadow they cast on the skin, they’ll stay hidden. But any other pixels that are lighter in the original image than they are on the Reduce Wrinkles layer will show through. - Source: Internet
- That may sound flattering, and if you’re doing work for a fashion magazine, it may be the result you want. But for those of us living in reality, wrinkles are a natural sign of aging, life experience and the wisdom that comes with it, not something to be shunned and removed through heavy-handed use of Photoshop. As the saying goes, just because you can do something doesn’t mean you should. - Source: Internet
- On the left is the effect with the blend mode set to Normal. On the right is the result using the Lighten blend mode. The difference can be subtle depending on your image, but here it’s especially noticeable in his forehead and around his eye on the right where some of the highlights along the wrinkles have returned: - Source: Internet
- Choose your photo and tap the Removal tool. Use the slider to select your brush size. Drag your finger over the wrinkles you want to erase. Tap Apply button to remove wrinkles in clothes Save your edits. - Source: Internet
- “We will use a unique Frequency Separation technique to target the wrinkles and straighten them out without disturbing the texture of the cloth. In this lesson, we will learn two techniques to target and remove the uneven folds and creases. Also, along the way, we will pick up on a few tips and tricks to get the most natural results possible.” - Source: Internet
- In this way, I create the curves layer and then invert it. Also, I have used the brush tool to paint over the areas to make the dark and fold area bright. Logically, I have also used the healing brush tool and the clone stamp tool to erase the wrinkles and other imperfections from the clothes. - Source: Internet
- In this tutorial, you’ll learn how to use the Healing Brush in Photoshop to retouch skin and reduce the appearance of dark and distracting wrinkles in your portraits. Notice that I said reduce, not remove, wrinkles. That’s because one of the most common skin retouching mistakes is to completely remove the wrinkles from a person’s face, making someone in their 40’s, 50’s, 60’s or later look like they’ve barely aged a day since they were a teenager. - Source: Internet
- Now simple use a soft brush and reduce the opacity to 80% to 85%. Then start drawing on the areas of the clothing where you see wrinkles. Gradually you’ll see that the wrinkles are fading away or getting replaced by the shirt’s color. - Source: Internet
- Finally, to bring back the wrinkles themselves, simply lower the opacity of the Reduce Wrinkles layer. You’ll find the Opacity option directly across from the Blend Mode option in the Layers panel. The more you lower it from its default value of 100%, the more you’ll reveal the wrinkles. Obviously we don’t want to bring them back completely, but an opacity value of somewhere between 40% and 60% usually works well. For this image, I’ll go with 60%: - Source: Internet
- Next, click and drag over an area that doesn’t have wrinkles, and release the click. Photoshop will now blend the pixels from the two areas together, removing the wrinkles from the first area and replacing them with pixels from the second area. The Shake Reduction option is a great technique to use to remove wrinkles from an image. - Source: Internet
- Though photoshop keeps a decent number of options to remove wrinkles from clothing, it’s not always possible to do that at home. Moreover, photographers and business owners often have to work with tons of images. This is really tough to work with that vast amount of images when you have lots of other things to handle. - Source: Internet
- To do this, select the Shake Reduction option, and then select the type of fabric your garment is made from. Select the area of the image that contains the wrinkles, and then click and drag over the wrinkles. You’ll now notice that the wrinkles have been removed from the image and replaced with smooth, flawless fabric. This is a great option to use if you have multiple wrinkles in the photo, or if you have a large wrinkle that covers a wide area. - Source: Internet
- The Spot Healing Brush chooses the area of good texture all on its own, which is what makes it so fast and perfect for things like removing pimples or other small blemishes. The regular Healing Brush, on the other hand, is great for larger or more complex problems (like wrinkles), but it does not choose the good texture on its own. Instead, we need to tell the Healing Brush which area of the image to sample the good texture from. As we’ll see in a moment, we do that by clicking on the area to set the sample point. - Source: Internet
- For the moment, we’re going to be completely removing the wrinkles. But of course, that’s not really what we want to do. We want to reduce the wrinkles, not remove them. So when we’re done, we’ll learn how to reduce the appearance of our retouching work to help the result look more natural. - Source: Internet
- Another significant sector that is strongly connected to the e-commerce world is photography. Apparel photography, along with post-production, is important to produce high-quality product images. That’s the reason why knowing how to remove clothing wrinkles in photoshop has high demand now. Designers are eager to learn these advanced techniques to level up their skills. - Source: Internet
- Still, wrinkles that appear too dark and noticeable, whether from bad lighting or just lack of sleep, can ruin an otherwise great portrait. So in this tutorial, we’ll learn how to reduce their impact through a combination of the Healing Brush, layer opacity, and one of Photoshop’s layer blend modes. I’ll be using Photoshop CS6 but this tutorial is also fully compatible with Photoshop CC . If you’re using Photoshop CS5 or earlier, you can still follow along here, or you may wish to check out the original version of this tutorial. - Source: Internet
- Another method you can use to remove wrinkles from your garment is to use the Smart Object and Rotate Tool. This is a particularly useful technique to use if there are multiple wrinkles in the image. Select the Smart Object and Rotate Tool, then click and drag over the wrinkles. - Source: Internet
- YouCam Perfect makes it easier than ever to remove wrinkles from your clothing. The Removal tool helps remove creases and folds so that you can create a professional look for any occasion. Here’s how to get wrinkles out of clothes in your photo. - Source: Internet
- Fashion photography or modeling photography is really common in the e-commerce world. If you just do fashion photography, you still need a model most of the time. While doing a fashion shoot, it’s really common to have wrinkles on your clothes. No matter how fit your model is. - Source: Internet
- When you want a clear, professional-looking photo, wrinkled clothes can ruin it. If you need to edit wrinkles of clothes after you snap pics, a photo editing app for iPhone and Android like YouCam Perfect can help. Keep reading to discover how to get wrinkles out of clothes in your photos with just a few taps! - Source: Internet
- Now, zoom in on your image so that you can see the details clearly. After zooming the image, start brushing the area where you see wrinkles. You will see the change immediately. This way, brush all the areas where you see wrinkles. When you’re done with brushing, zoom out and check if you’ve touched all the areas. - Source: Internet
- Wrinkles can make even the most beautiful photo look unappealing. Unfortunately, these stubborn creases keep appearing on our clothes no matter how many times we iron them. Thankfully, Photoshop has a few tricks up its sleeve to remove wrinkles from your images and leave them looking perfect once again. - Source: Internet
- We only remove wrinkles that are not supposed to be there. Like this one, on the chest. Why is it even here, all of a sudden, on a flat surface? When you see something like this, it’s only reasonable if you grab the Spot Healing Tool and remove it. - Source: Internet
- You know very well as an e-commerce seller how the flawless product photo impacts both on increasing selling and conversation rate. The online buyers stack with the photos that attract their eyes. If you are a clothing seller, then, it matters a lot. You don’t like to showcase the clothing wrinkles to your buyers. Like the same way, your buyers also never see the clothing photos that have wrinkles. - Source: Internet
- So I’m going to change the wet value to something like 20 and make sure I am on the low working layer. And I’m going to brush across the wrinkle or the fold and make the brush big enough where it takes care of My wrinkles in my creases. We’re maintaining the texture. - Source: Internet
- Photoshop has made so many tasks easy for everyone that was only for experts before. Now, these works are not just for pro designers; anyone can do that if they want. There are several tools in photoshop to remove wrinkles from clothes. - Source: Internet
- Learn to use the amazing power of Frequency Separation to magically even out the creases without disturbing the texture of the fabric. Best Way to Remove Wrinkles from Clothes in Photoshop In this video, we will learn how to separate the image into wrinkles and fabric texture so that we can just work on the wrinkles and not affect the texture. Using the mixer brush, we will even out the wrinkles and creases. - Source: Internet
- This will remove the wrinkles from the original image and replace them with the pixels from the new area, ensuring that the image appears flawless. This is a great option to use if you have wrinkles in different areas of the image that need removing. You can select up to nine different areas to fill with pixels. The process will then blend the pixels together to create a smooth surface and erase the wrinkles. - Source: Internet
- And you may use any other tool like the clone stamp or the healing brush if you’re not getting the results you want out of the mixer brush. And so we’re just pushing the colors and mixing them. We’re not actually painting with the color. Just trying to minimize some of these folds or wrinkles. - Source: Internet
- I’m going to zoom in on one of the man’s eyes so I can get a closer look at what I’m doing. I’ll do that by pressing and holding Ctrl+spacebar (Win) / Command+spacebar (Mac) key on my keyboard, which temporarily switches me to Photoshop’s Zoom Tool. Then I’ll click a few times on his eye to zoom in. I’ll start by removing some of the smaller wrinkles before removing the larger one under the eye. - Source: Internet
- Fortunately, there’s a couple of easy ways to do that. First, we can bring back more of the original skin texture around the wrinkles by changing the blend mode of the Reduce Wrinkles layer from Normal (the default mode) to Lighten. You’ll find the Blend Mode option in the upper left corner of the Layers panel: - Source: Internet
- If removing wrinkles isn’t enough or you want to try a new look, YouCam Perfect’s Clothes feature can help. The app automatically detects your clothes in your photo so that you don’t have to do any manual work. YouCam Perfect has lots of options to choose from, and you can try on every pattern from camo to plaid to floral. If you don’t see one you like, you can even add your own! Here’s how you can change your clothing patterns on iPhone in just a few taps: - Source: Internet
- Using the Healing Brush in Photoshop is a simple two-step process. First, we click on an area of good texture to sample it, and then we paint over the problem area to replace the bad texture with the good texture. But one important thing to keep in mind when reducing wrinkles is that skin texture appears different in different areas of a person’s face. The skin around your eyes, for example, has a different texture to it than the skin on your cheeks or your forehead. If you want your retouching work to look as realistic as possible, try to sample good texture from an area close to the wrinkle to keep the skin looking consistent. - Source: Internet
 To get you started, here are some pointers to consider when searching for information regarding How to remove clothing wrinkles in Photoshop:
- Do some research to find Add Pattern To Clothing Photoshop-related information from reputable sources. This may include professional journalists, as well as online libraries and other websites.
- When looking for information regarding Add Pattern To Clothing Photoshop, it is crucial to be aware of the various types of sources that can be found through electronic media. Some examples of these types of sites include Google and YouTube. There is also the possibility of obtaining information about Photoshop Remove Eye Bags from various social media sites, such as Facebook and Twitter. This is another another potential source.
To get you started, here are some pointers to consider when searching for information regarding How to remove clothing wrinkles in Photoshop:
- Do some research to find Add Pattern To Clothing Photoshop-related information from reputable sources. This may include professional journalists, as well as online libraries and other websites.
- When looking for information regarding Add Pattern To Clothing Photoshop, it is crucial to be aware of the various types of sources that can be found through electronic media. Some examples of these types of sites include Google and YouTube. There is also the possibility of obtaining information about Photoshop Remove Eye Bags from various social media sites, such as Facebook and Twitter. This is another another potential source.Video | How To Remove Wrinkles From Fabric In Photoshop
Reading and doing research on the authenticity of each source are both essential if you want to discover the greatest information there is about Compositing Photoshop Lighting. Your understanding of Piximperfect Store will be improved by watching the many videos on how to remove wrinkles from fabric in photoshop that are included in this page. These films come from a variety of different sources. Finding knowledge on a wide range of subjects is made much simpler by making use of the internet as a resource.
## Here are some crucial points concerning Photoshop How To:- How To Remove Wrinkles From Fabric In Photoshop
- How To Remove Wrinkles From Clothes In Photoshop
- How To Remove Wrinkles From Shirt In Photoshop
- How To Remove Wrinkles From Clothing In Photoshop
- How To Remove Creases From Clothes In Photoshop
You won’t have any trouble finding the information you’re looking for because there are so many websites and forums on the subject of How to Remove Clothing Wrinkles in Photoshop.
When it comes to obtaining information on Smooth Background Photoshop, the majority of individuals are more accustomed to using a different route. It enables a more in-depth look at the information regarding How to Iron Clothes and fix wrinkles in Photoshop Get rid of wrinckels in clothing and fabrics with Photoshop’s content and how it may be used, which is really helpful.

strategies to design information displays that are both aesthetically pleasing and functional that pertain to Photoshop Remove Eye Bags. They are useful in commercial and marketing settings, and they can also be put to use to convey information on Smooth Background Photoshop. As a result, we also supply some photos pertaining to how to remove wrinkles from clothes in photoshop.
In summary, this article offers a comprehensive analysis of Smooth Background Photoshop. In addition, How to remove wrinkles on clothing - Photoshop Tutorial and Photoshop Remove Frizzy Hair are mentioned here as a comparison of your knowledge regarding Smooth Background Photoshop.
